AI Tag Assistant
The AI Tag Assistant uses natural language conversation and document parsing capabilities to automatically identify device protocols and extract tag parameters, enabling one-click standardized production of massive device point tables. Its core purpose is to significantly reduce the cost of tag configuration and mapping during device integration, allowing even non-professional engineers to get started quickly.
Feature Description
- Basic Text and Attachment Parsing: Supports describing point table requirements via natural language, or uploading point table attachments in common text formats such as
.csvand.txt. The AI can directly read and understand the point table content, automatically extracting key information. - Intelligent Protocol Identification and Mapping: Automatically analyzes text content or attachment data, accurately identifies common industrial protocols (e.g., Modbus, Siemens S7, etc.), and automatically maps them to standard data types within the system.
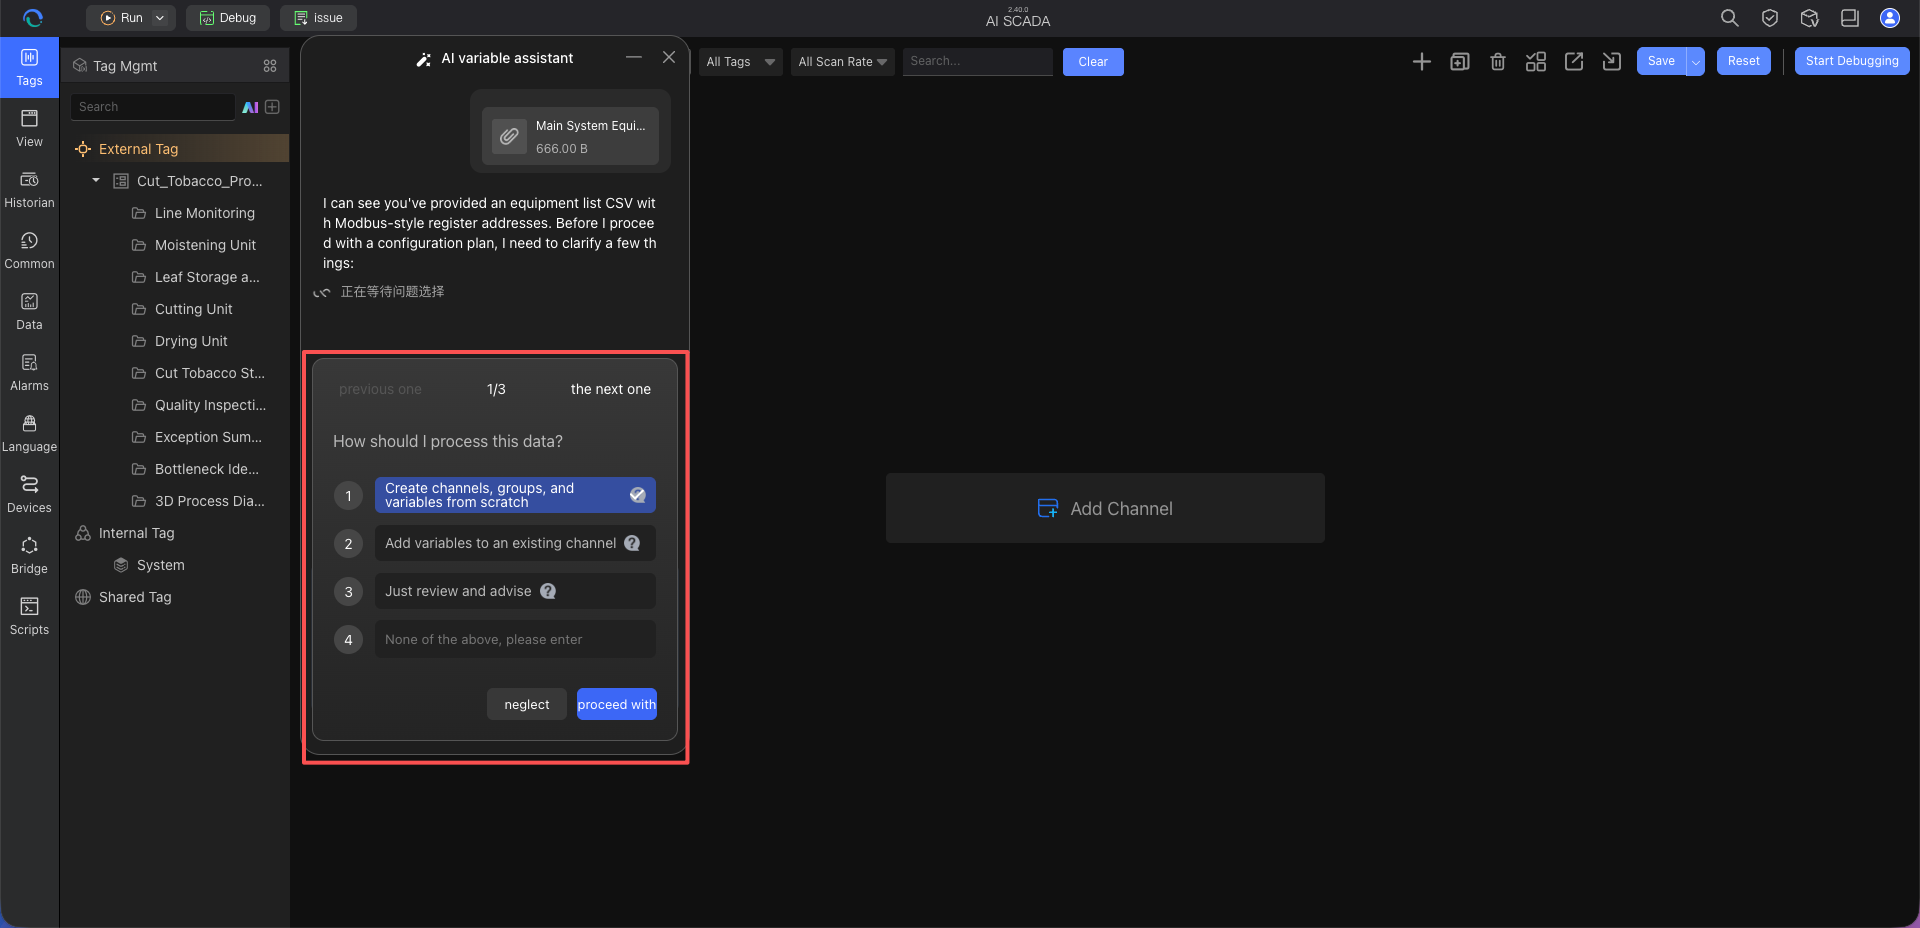
- Conversational Card-Based Guidance: During parsing, if the AI finds missing channel parameters (such as device IP, port number) or some tag key information, it will ask the user through intuitive cards, guiding them to supplement the missing details.
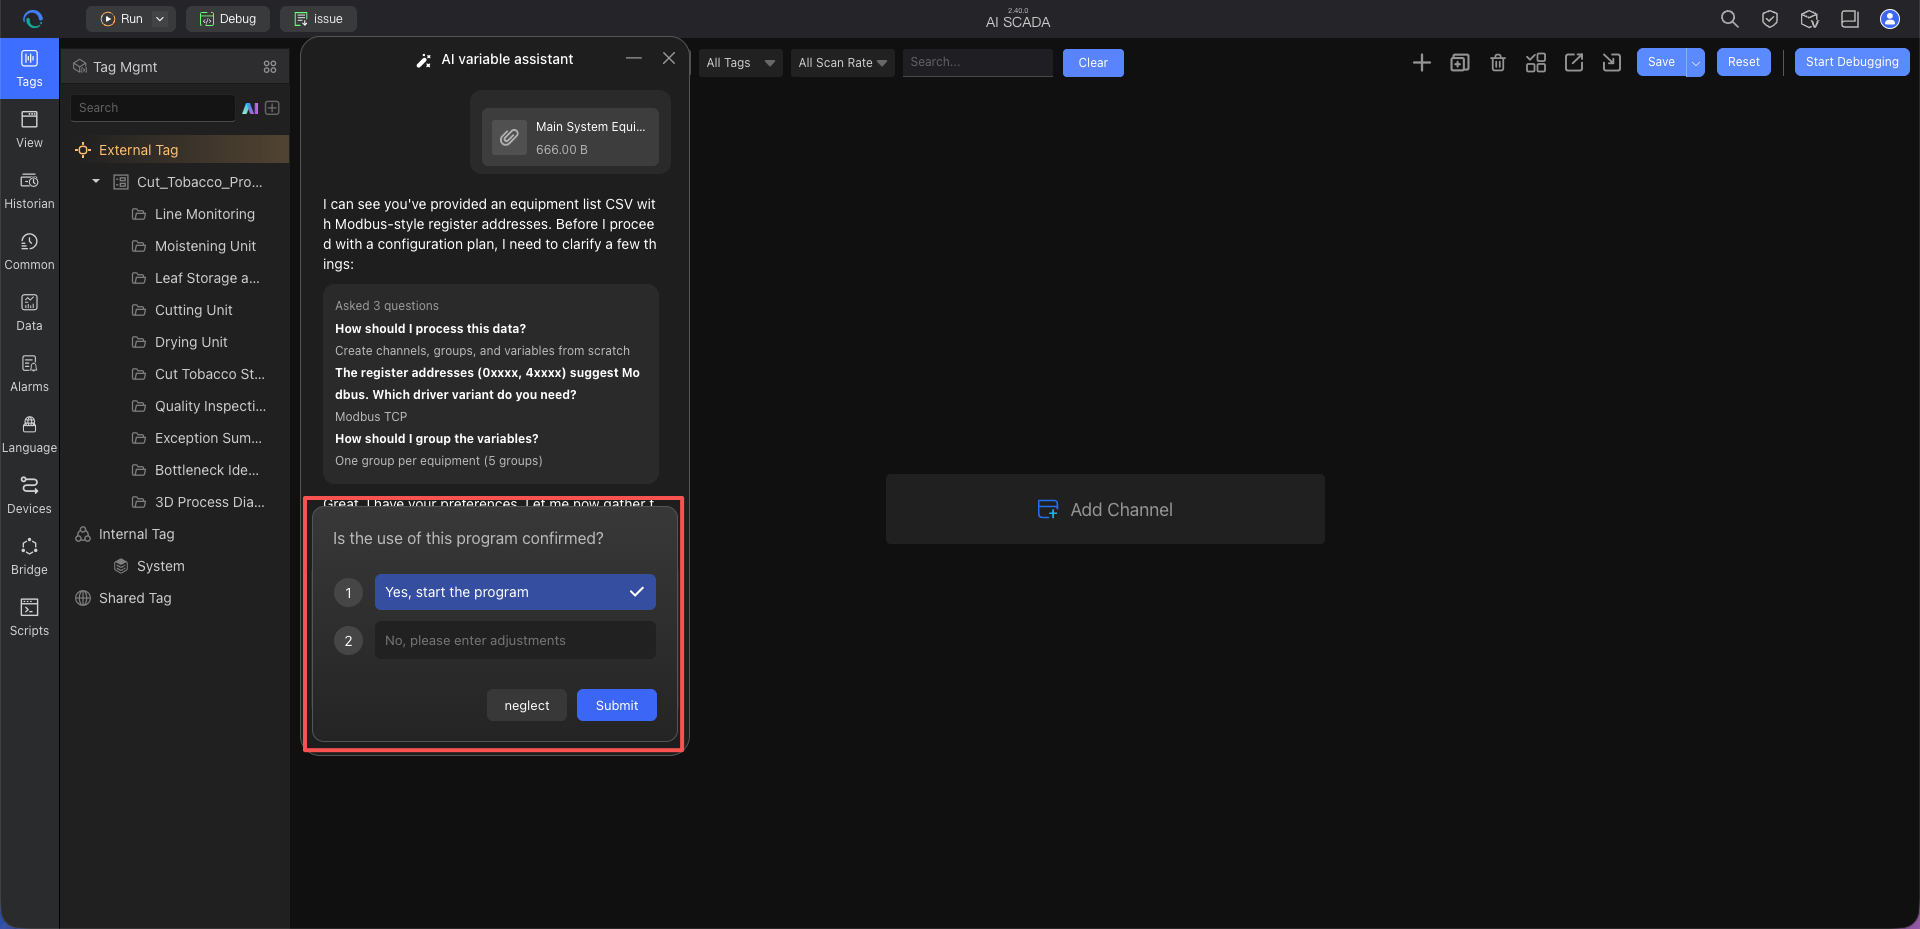
- Plan Confirmation and One-Click Storage: Before final writing, the AI generates a complete tag import plan for user confirmation. After confirmation, the AI automatically executes tag database creation and binding, and the user can directly view the results in the tag list.
Core Advantages
1. Interactive Guidance Lowers the Barrier
Unlike traditional fixed-template imports (where an extra or missing column causes errors), the AI assistant uses conversational interaction. Even if the uploaded point table file is incomplete, the AI proactively identifies missing items and guides the user to supplement them through friendly card-based questions, achieving "zero-barrier" integration.
2. Leap in Integration Efficiency
From formatting, consulting protocol manuals, to entering tags one by one, the device point table import cycle is shortened from traditional "days/hours" to "minutes". For CSV point tables with hundreds or thousands of entries, the AI completes structured parsing and plan generation within minutes.
Typical Scenarios
Scenario 1: Fast Batch Import Based on a CSV Point Table
Background: An engineer receives a .csv point table from a device manufacturer, containing hundreds of register addresses and tag names.
AI Approach:
- The engineer sends the CSV file to the AI assistant.
- The AI parses the file, detects that the device IP address is missing, and prompts the user via a card popup.
- The engineer fills in the IP address in the card and submits.
- The AI generates the final import plan; after confirmation, hundreds of tags are stored instantly. Value: Eliminates the manual effort of converting manufacturer point tables into system-specific import templates, with extremely high fault tolerance.
Scenario 2: Small-Batch Quick Creation Based on Natural Language
Background: During debugging, an engineer temporarily needs to add a few temperature and pressure monitoring points for a test device. AI Approach:
- Directly send a message to the AI: "Create a Modbus TCP channel with IP 192.168.1.100, containing temperature (40001) and pressure (40002), both of type UInt16."
- The AI automatically understands and generates a complete configuration plan in the background.
- The engineer clicks confirm to execute. Value: Avoids tedious menu navigation and form filling; system configuration is done as easily as chatting with an assistant.
5-Minute Quick Start
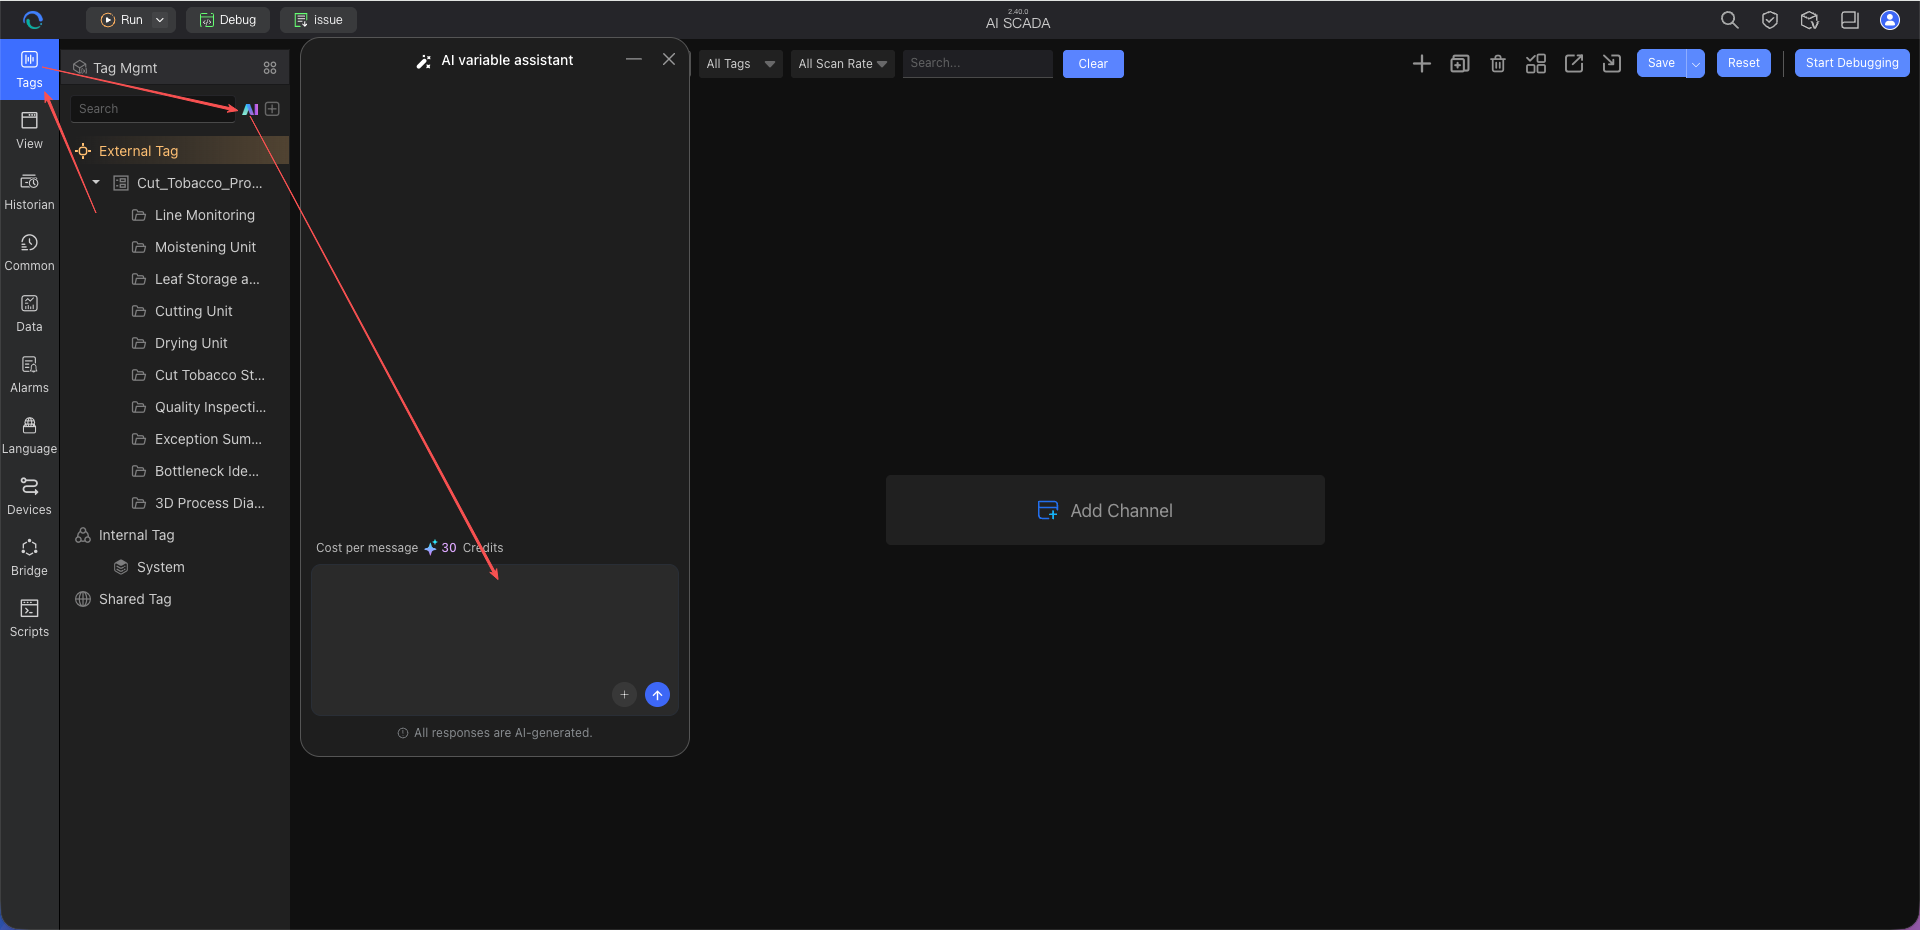
Step 1: Open the AI Assistant and Enter Your Requirements
Open the AI assistant dialog in the system. You can directly enter a text description of your requirements, or upload a point table file in .csv or .txt format as an attachment to send to the AI.
Step 2: AI Analyzes Request and Prompts via Cards
After receiving the message, the AI automatically parses the file or text for channel and tag information. If any required fields are missing (e.g., protocol type not specified, device IP not provided, etc.), the AI sends a supplementary information card in the conversation stream.
Step 3: Fill in the Missing Information and Submit
Simply fill in the missing information in the corresponding input fields or dropdown menus according to the card prompts, then click submit.
Step 4: Confirm the Import Plan
Once all information is complete, the AI generates a clear confirmation plan, showing the channel parameters to be created and the specific tag list. You can check whether the plan meets your expectations.
Step 5: Execute the Write and View the Results
Click "Confirm and Execute" on the plan card. The AI automatically writes the channel and tag data into the system in the background. After completion, you can go directly to the Tag Management list in the system to view the successfully imported tag records.
Tips for Querying and Operation
Tip 1: Provide as Much Complete Information as Possible in Your Description
If you want to skip the AI's questioning phase in one go, provide all essential elements in your first message. For example, when sending an attachment, add a note: "This is an S7 protocol point table. Device IP is 10.0.0.5, Rack is 0, Slot is 1." The AI will directly read these parameters and generate the final plan.
Tip 2: Iteratively Improve in Batches
For complex integration needs, you can also tell the AI gradually, as if in a conversation. For example, start by saying, "I want to import a batch of tags," then upload the attachment after the AI asks for it. This progressive interaction is equally smooth.
Frequently Asked Questions
Q1: What file formats are currently supported for upload?
A: Currently, mainly supports standard text-based tabular files such as .csv and .txt. If your data is in Excel (.xlsx), it is recommended to save it as CSV format first before uploading.
Q2: What if I find parsing errors during the plan confirmation phase?
A: If you notice that an address or type mapping does not match expectations in the AI-generated confirmation plan, you can directly tell the AI in the dialog: "The data type for the pressure tag should be Float instead of UInt16." The AI will correct the plan based on your feedback and ask for confirmation again.
Q3: Why does the AI keep asking me for information?
A: This is because creating underlying device channels requires meeting certain mandatory parameters (e.g., IP address, port, connection parameters for specific protocols). If these parameters cannot be found in the documents and descriptions you provided, the AI will ask via cards until all necessary conditions are collected, ensuring the success of subsequent communication.
Best Practices
1. Start with a Small Batch for Validation
When using the AI for the first time, it is advisable to select a small segment of the point table or a few tags for an initial import test. Familiarize yourself with the AI's parsing approach, card questioning, and plan confirmation process before handling the complete point table.
This allows you to quickly master the operation method and also identify issues with the original point table's headers, address formats, data types, or protocol parameters early, avoiding the need for centralized corrections after importing a large number of tags.
2. Standardize the Headers of the Original Point Table
Although the AI can fuzzy-recognize content, clearly labeling headers in the .csv point table greatly improves the accuracy of the first parsing and reduces the communication cost of subsequent modifications. It is recommended to include at least:
Tag NameRegister AddressorAddressData TypeRead/Write PermissionUnitTag Description
If the point table comes from a device manufacturer, check for merged cells, blank rows, extraneous explanatory text, or mixed device data in the same table before import. If necessary, first organize it into a clearly structured CSV file.
3. Provide Key Communication Parameters in the First Conversation
The AI can ask for missing information via cards, but if you already know the protocol and device communication parameters, it is recommended to state them together when sending the point table for the first time.
Example:
Please import this CSV point table.
Protocol: Modbus TCP, device IP: 192.168.1.100, port: 502, station number: 1.
Add the prefix Line2_ to all tag names, and keep the original tag descriptions.
Please generate an import plan first, and execute after confirmation.
Common information to specify in advance includes:
- Protocol type, e.g., Modbus TCP, Siemens S7, etc.
- Communication parameters such as device IP, port, station number, Rack, Slot
- Tag naming prefix or grouping rules
- Whether to keep the original manufacturer tag names and descriptions
- How to handle duplicate tag names
4. Establish a Unified Tag Naming Convention
The clearer the tag naming, the more stable the results from the subsequent AI Table Assistant, AI Page Assistant, and AI Smart Binding. It is recommended that teams adopt a unified naming convention.
Recommended Format:
Device Type_Device ID_Parameter Type_Parameter Number
Examples:
Injection_M1_Temperature_01
Injection_M1_Pressure_Main
Packaging_L1_Speed_Conveyor
If you must keep manufacturer tag names, it is also advisable to supplement the device, station, parameter meaning, and unit in the tag description to facilitate later AI recognition.
5. Make Good Use of Plan Confirmation and Iterative Corrections
The AI Tag Assistant does not skip confirmation and write directly to the system. Before execution, focus on verifying the following:
- Whether the channel name and protocol type are correct
- Whether communication parameters such as IP, port, station number are correct
- Whether tag addresses comply with device protocol rules
- Whether data types match the actual data
- Whether read/write permissions meet engineering requirements
- Whether tag naming and grouping facilitate later maintenance
If multiple adjustments are needed in the plan, it is recommended to specify all modification points in one go to reduce back-and-forth dialogue.
Please make the following adjustments:
1. Change the data type of all pressure tags to Float.
2. Change the tag name prefix from Line2_ to PressLine2_.
3. Add the unit ℃ for temperature tags.
4. Disable write permission for all read-only tags.
6. Combine with Table Creation and Smart Binding
Once you have successfully stored tags using the AI Tag Assistant, you can continue with other AI assistants to complete the full engineering chain:
- Use the AI Table Assistant to create historical archive tables, statistical tables, or business data tables for key tags.
- Use the AI Page Assistant to generate monitoring pages or data dashboards.
- Use the AI Smart Binding to quickly bind page components to the imported tags.
- Use the API Integration Assistant to connect third-party system interface data to CMS.
This process enables end-to-end intelligent construction from device integration, data accumulation, to page display.
7. Perform Testing and Validation After Import
After tags are officially written into the system, complete basic validation before putting them into production:
- Check that the number of tags matches the plan.
- Spot-check the addresses, data types, and read/write permissions of key tags.
- Verify that real-time values refresh correctly after connecting to the device.
- Conduct focused testing for critical tags such as trends and reports.
- Confirm that tag grouping and naming facilitate subsequent page binding and maintenance.
Next Steps
- AI Table Assistant – After importing tags, learn next how to configure historical archives, statistical tables, and business data tables.
- AI Page Assistant – First learn how to generate monitoring pages and data dashboards via natural language, quickly understanding the page generation capabilities of the AI assistant.
- AI Smart Binding – Once both tags and pages are ready, continue learning how to bind tags to page components.
- API Integration Assistant – When tags need to receive data from MES, ERP or cloud platform interfaces, continue learning about API interconnection configuration.
- AI Script Assistant – When tags need to participate in business calculations, interlocking control, or system integration, continue learning script development.